How to add and manage users on your HitPay account
As your business grows, you may need to hire more people to manage additional demand and sales. HitPay’s User Management feature makes it easy to bring other people on board, be it temporary staff, external consultants, or full-time employees.

As your business grows, you may need to hire more people to manage additional demand and sales.
HitPay’s User Management feature makes it easy to bring other people on board, be it temporary staff, external consultants, or full-time employees. You can manage who has access to different parts of your business, in just a few clicks.
This article covers how to use User Management on HitPay to add, remove, and manage users. We’ll also explain the difference between each user permissions level, so you can best assign each role.
What you can do with HitPay’s User Management feature:
- Add and remove users to your HitPay account with ease.
- Assign user roles with differing levels of account access.
This lets you give team members the exact permissions they need without exposing other parts of your business. For example, you can enable front-of-house staff to accept transactions on your HitPay account, without compromising any sensitive business details.
All you need to know about HitPay’s user roles
HitPay offers four levels of user access: Owner, Admin, Manager and Cashier. Let’s go into what each role offers and the difference in account permissions.
1) Owner: Maximum permissions
The Owner gets full access to all dashboards in HitPay. They can add and remove other users, including users with Admin permissions. Owners can access all business reports from finance and inventory management, and receive account notifications.
Naturally, the Owner role is best suited to the person who runs the business. Unlike the other roles, the Owner role isn’t assigned to a user, but is given to the person who sets up the HitPay account.
2) Admin: Perfect for accounting and finance roles
Like the Owner, the Admin has full access to all dashboards in HitPay and can invite new users with Manager and Cashier roles. They can also access all reports and will receive notifications.
Unlike the Owner role, however, the Admin won’t be able to add or remove other Admins.
The Admin role is best suited to people who hold significant administrative responsibility — for example, your Head of Finance. If you work with an external accounting firm to manage your finances, the Admin role is also perfect for giving them access to all they need.
3) Manager: For non-finance operational staff
Users in the Manager role can access dashboards and reports in HitPay. However, more sensitive details like bank account numbers and API keys are view-only — meaning they won’t be able to change these details.
As such, the Manager role is excellent for staff with heavy operational responsibilities who need access to inventory management, invoicing, and customer details.
4) Cashier: For front-of-house or temporary staff
Got a physical event or hiring temporary workers for peak seasons?
Use the Cashier role to enable them to accept payments using your point of sale software. They’ll also be able to manage recurring billing, invoices and view the last ten sales transactions, making this role fantastic for customer-facing positions at events or your physical store.
How to add a new user to your HitPay account
Step 1: Log in to your HitPay dashboard. Go to Settings > User Management

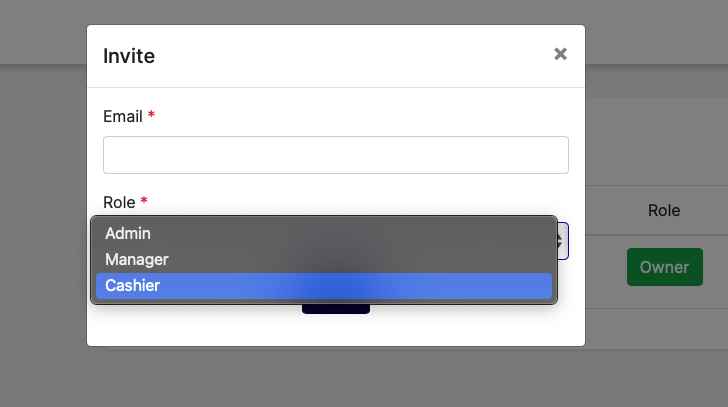
Step 2: Click on the Invite button.
Step 3: As the Owner, you can add other users to your HitPay account. These users can either have Admin, Manager and Cashier roles, depending on the permissions you’d like to assign them. Refer to the section above for the differences between each role. Click Invite once you’ve decided on the permissions and enter their email address.
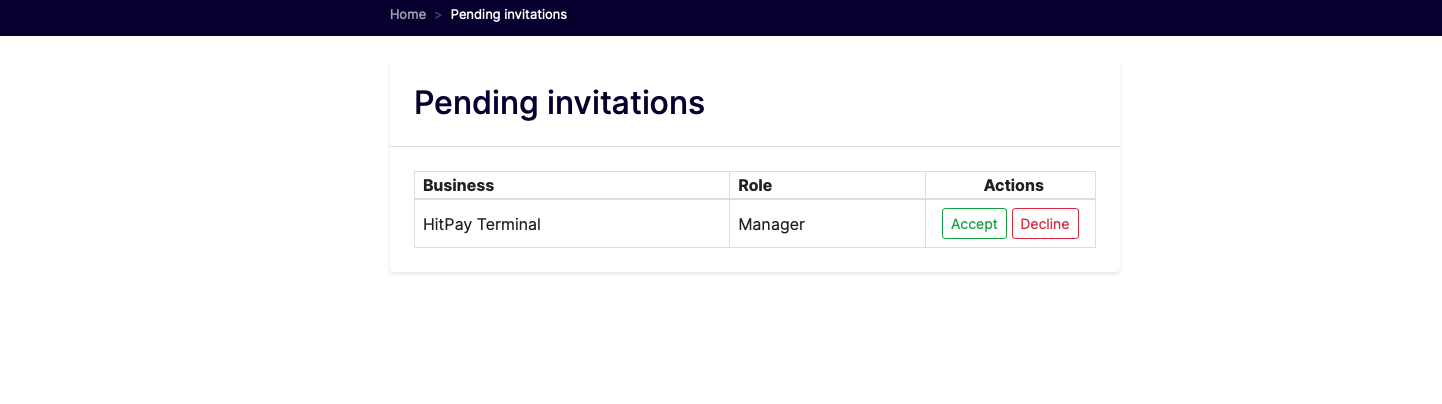
People you invite to your HitPay account have a Pending Invitation status if they have not yet accepted your invite.

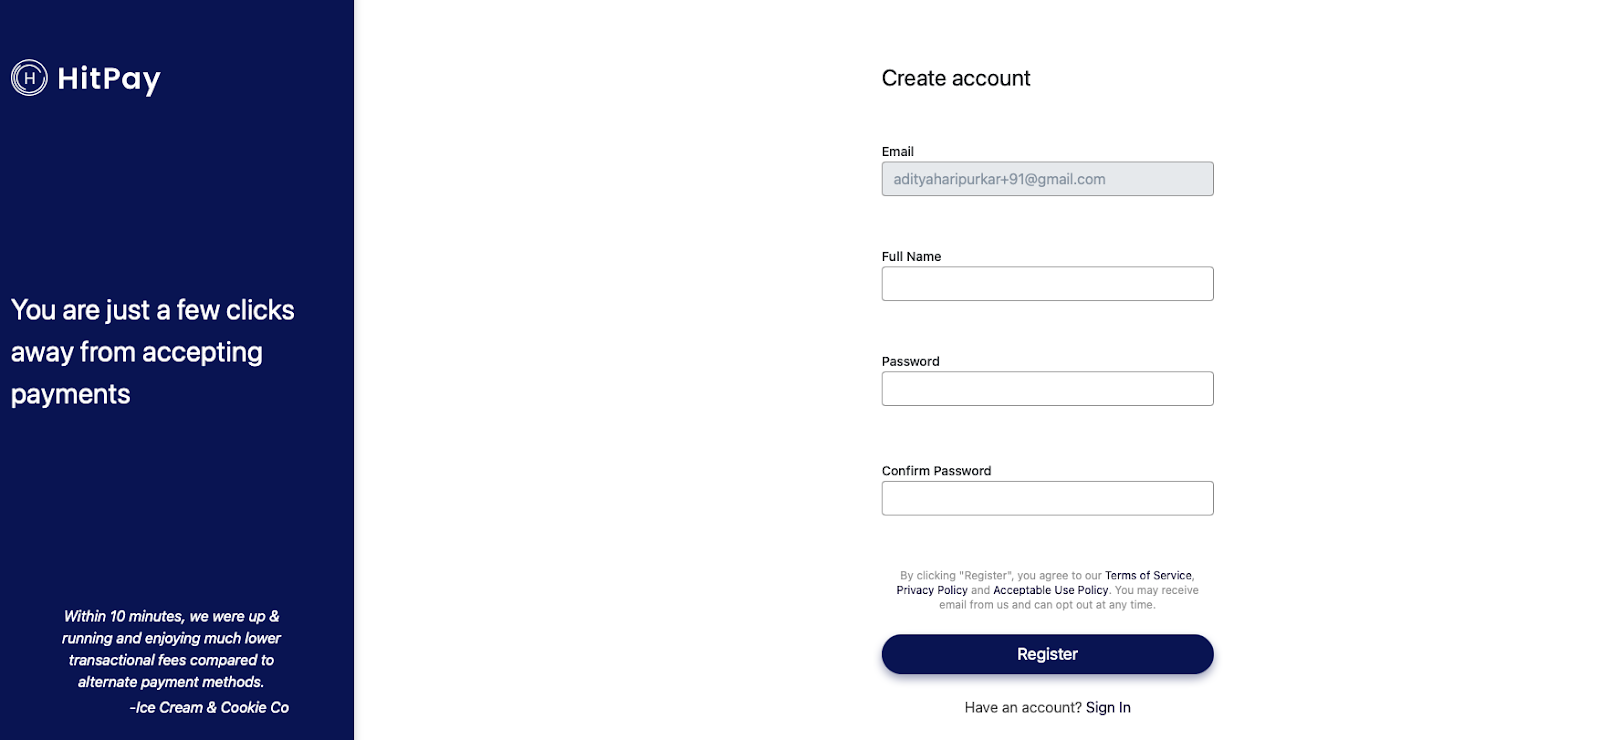
Step 4: HitPay sends an email to the person’s email address you’ve invited.

Step 5: Ask your invited user to click on View Invitation, and they’ll be directed to create their user account in HitPay.
Step 6: Once they’ve created their account, they’ll see a Pending Invitation tab. Here, they can click Accept to start accessing your HitPay account.
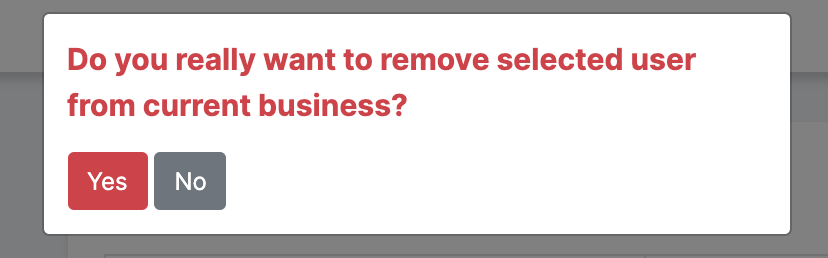
How to remove users or change an existing user’s permissions
Go to Settings > User Permissions in HitPay. You’ll see a list of both active and pending users.
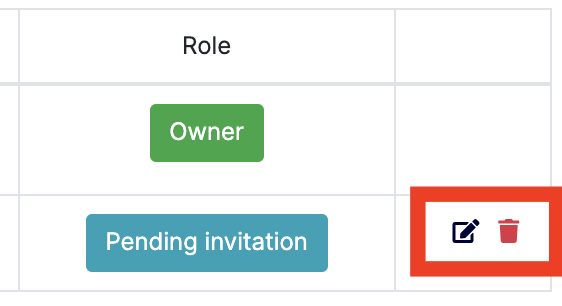
Next to each user’s details, you’ll see two icons. Click the Pen icon to Edit Role. This allows you to adjust the user’s role permissions.

You can also remove inactive users from your business if they’re no longer working with you. Just click the Trashcan icon to Remove Role.
Manage a growing business with ease on HitPay
HitPay keeps user management simple while maintaining the privacy and security you need for your growing business. Onboard team members with ease so you can focus on doing what you do best — running your business.
Try HitPay’s User Management feature now!
Read also: How to Start an E-Commerce Business in Singapore With Hitpay’s Online Store — Step-by-Step Guide
About HitPay
HitPay is a one-stop commerce platform that aims to empower SMEs with no code, full-stack payment gateway solutions. Thousands of merchants have grown with HitPay’s products, helping them receive in-person and online contactless payments with ease.
Join our growing merchant community today!